
C40PTire Pressure Monitoring Sensor User Manual
Complete instructions for the C40P tire pressure monitoring sensor, from installation to routine maintenance.
Safety information
01.01Child and small-parts safety
Keep the product and detachable small parts out of children's reach. The following coin-cell battery precautions apply only to kits with tire pressure sensors.
For sensor battery replacement, see Section 03.06; for sorting batteries and packaging for disposal, see Section 04.03 。
01.02Valve safety notice
Before installing an external TPMS sensor, confirm that the valve, wheel construction and installation position are suitable.
Product, package contents and specifications
02.01Package contents
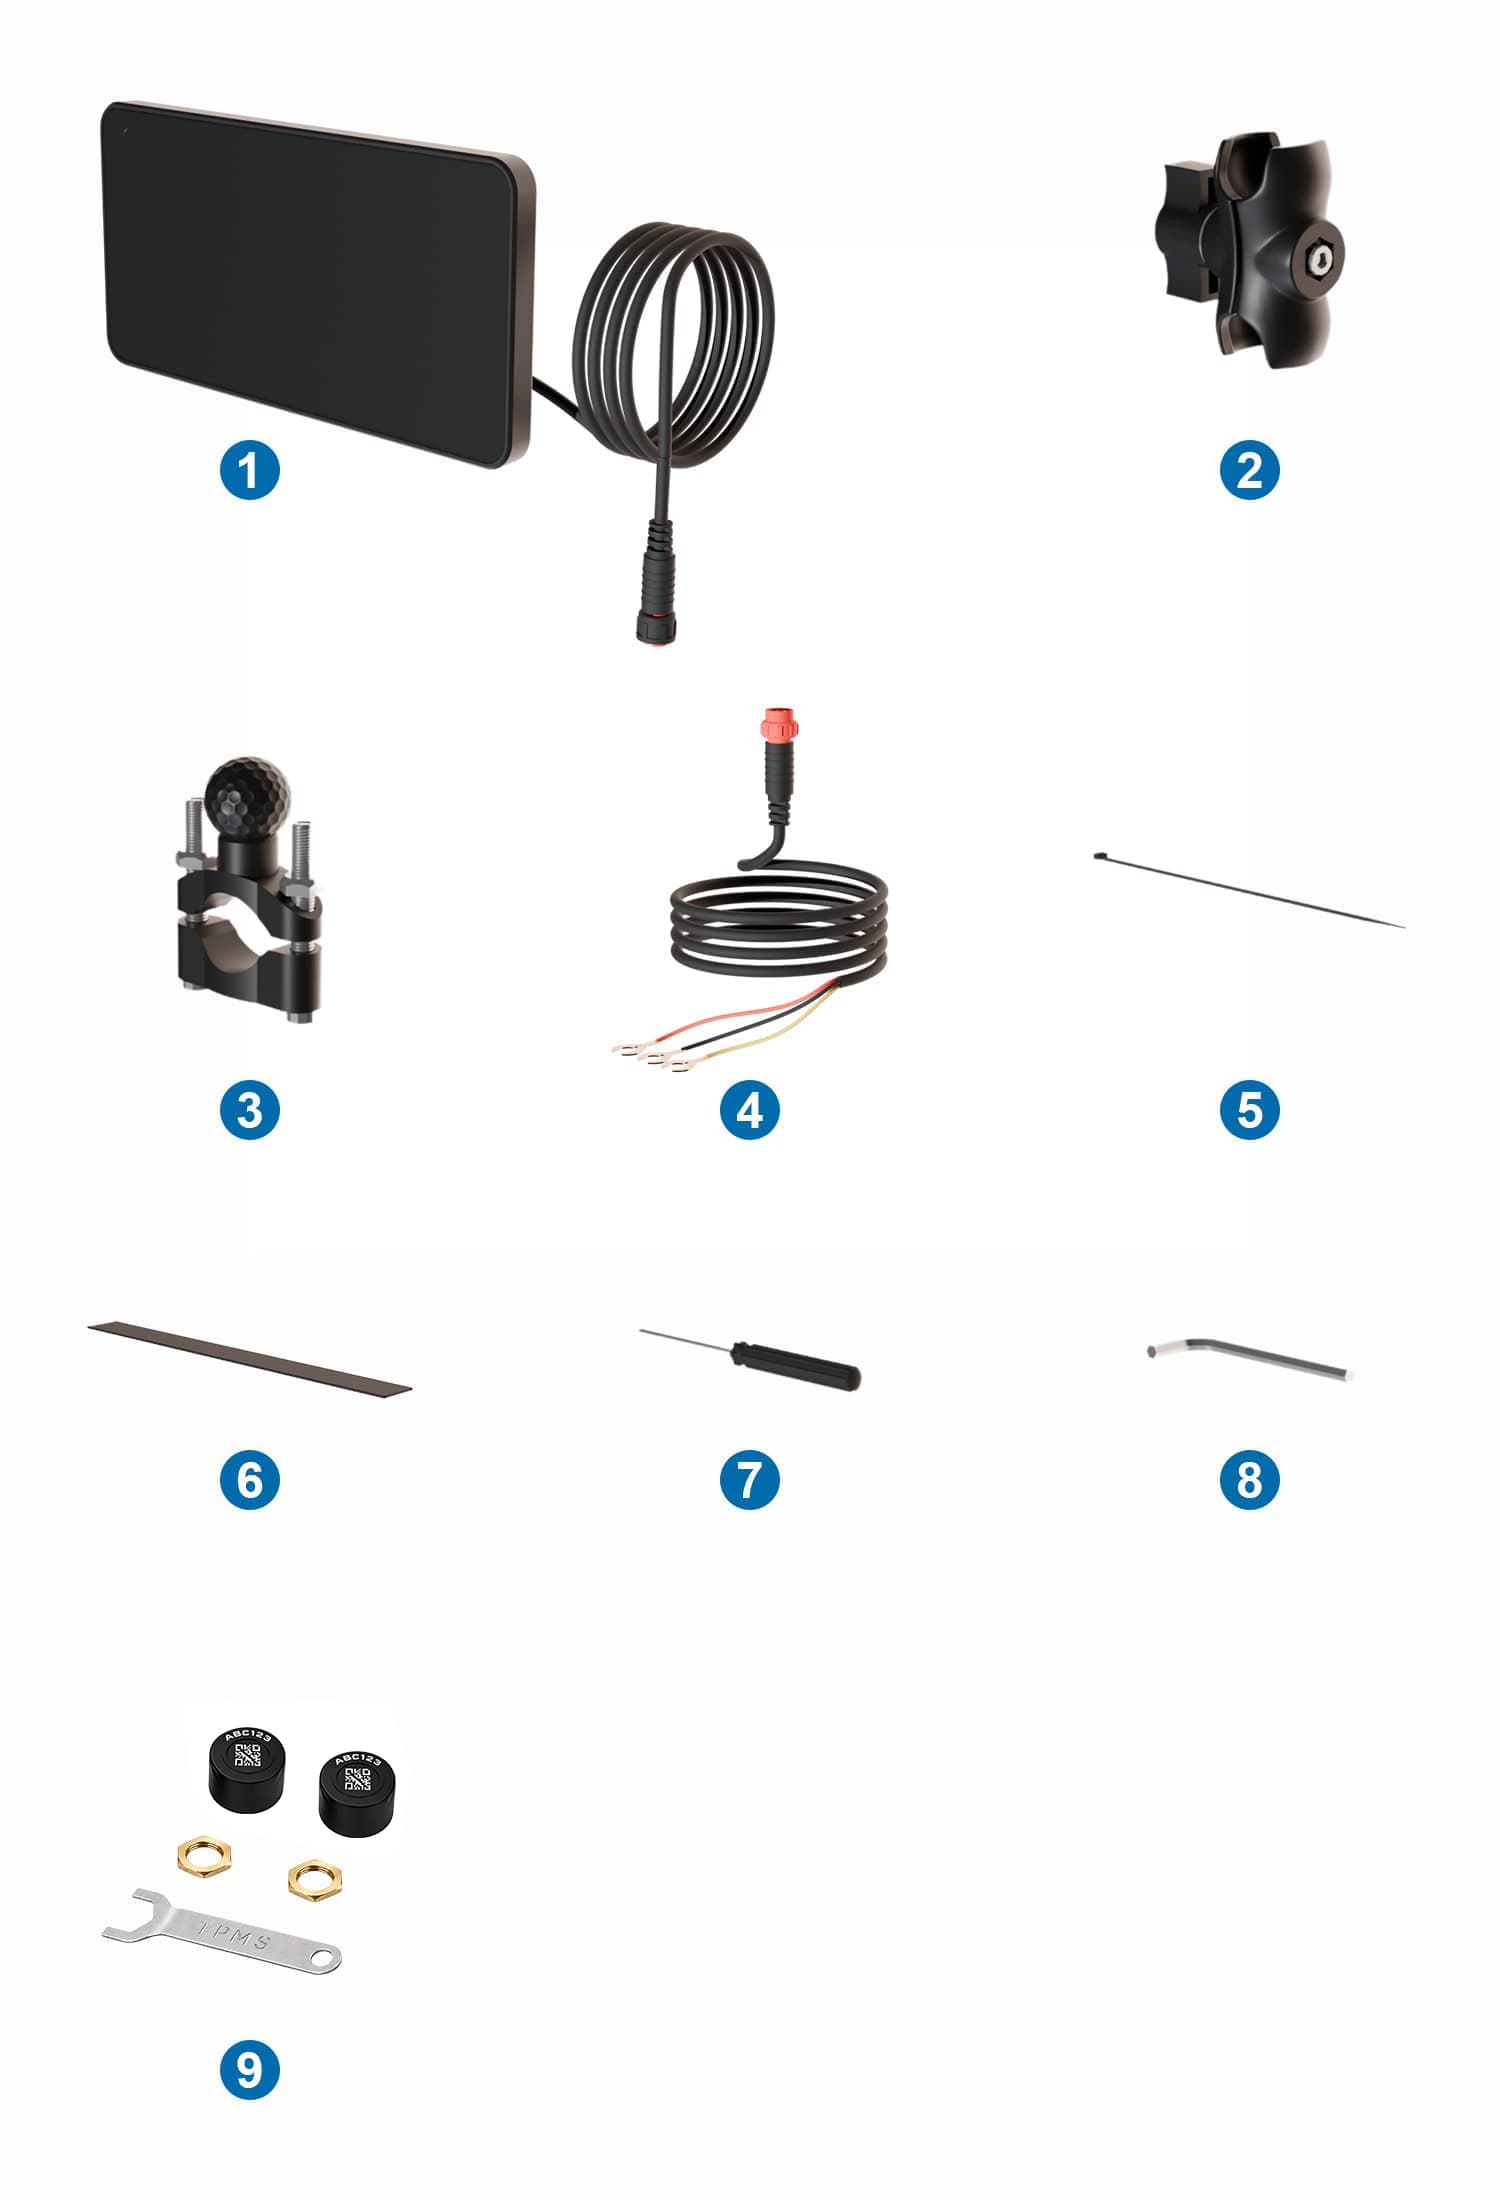
| No. | Name | Description |
|---|---|---|
| 1 | Tire pressure sensor kit | 2 sensors per kit, each with 1 CR1632 battery installed; includes the matching wrench and nuts |
02.02Tire pressure sensor specifications
| Item | Specification |
|---|---|
| Battery | CR1632 (installed in sensor) |
| Measurement range | 0–116 psi(0–8 bar) |
| Measurement accuracy | Approximately ±1.5 psi (±0.1 bar) |
| Alarm thresholds | User-adjustable on the device |
Tire pressure monitoring pairing
03.01Preparation before pairing
-
Remove the valve cap
Remove the cap from the tire valve where the sensor will be installed.
-
Pre-install the locknut
Thread the supplied anti-theft locknut onto the valve. Do not install the sensor yet.
03.02Tire pressure pairing
The pairing method depends on the display version; both methods are not offered together. After tapping a wheel, use manual pairing if a code-entry window appears, or automatic pairing if “Pairing” appears. Follow the steps that match your actual screen.
03.03Automatic pairing (automatic-pairing versions)
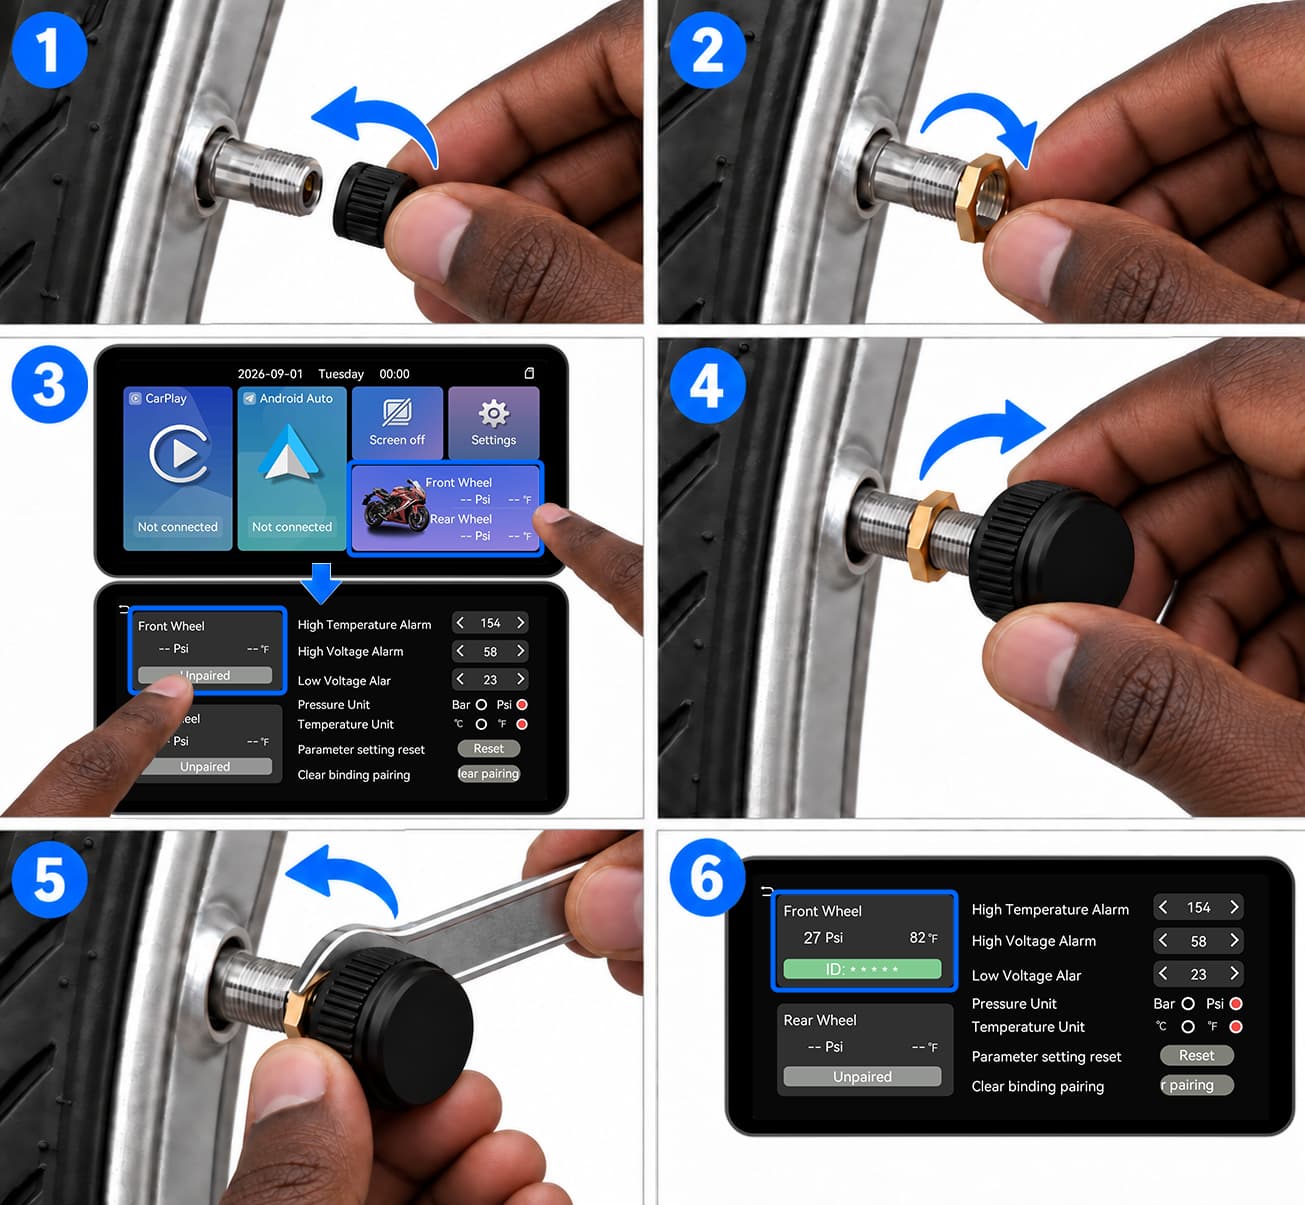
Sensor installation sequence for automatic-pairing versions
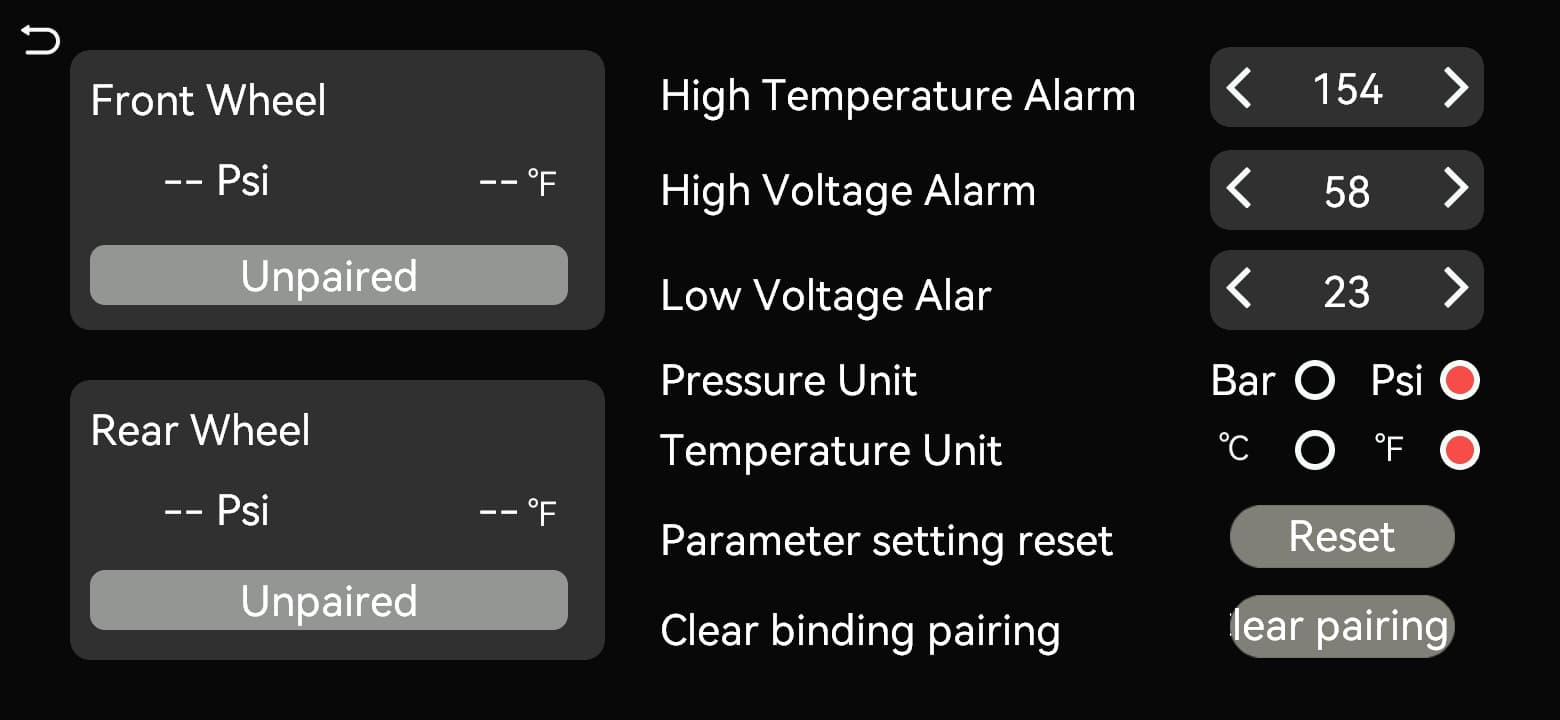
Tap the wheel position to pair
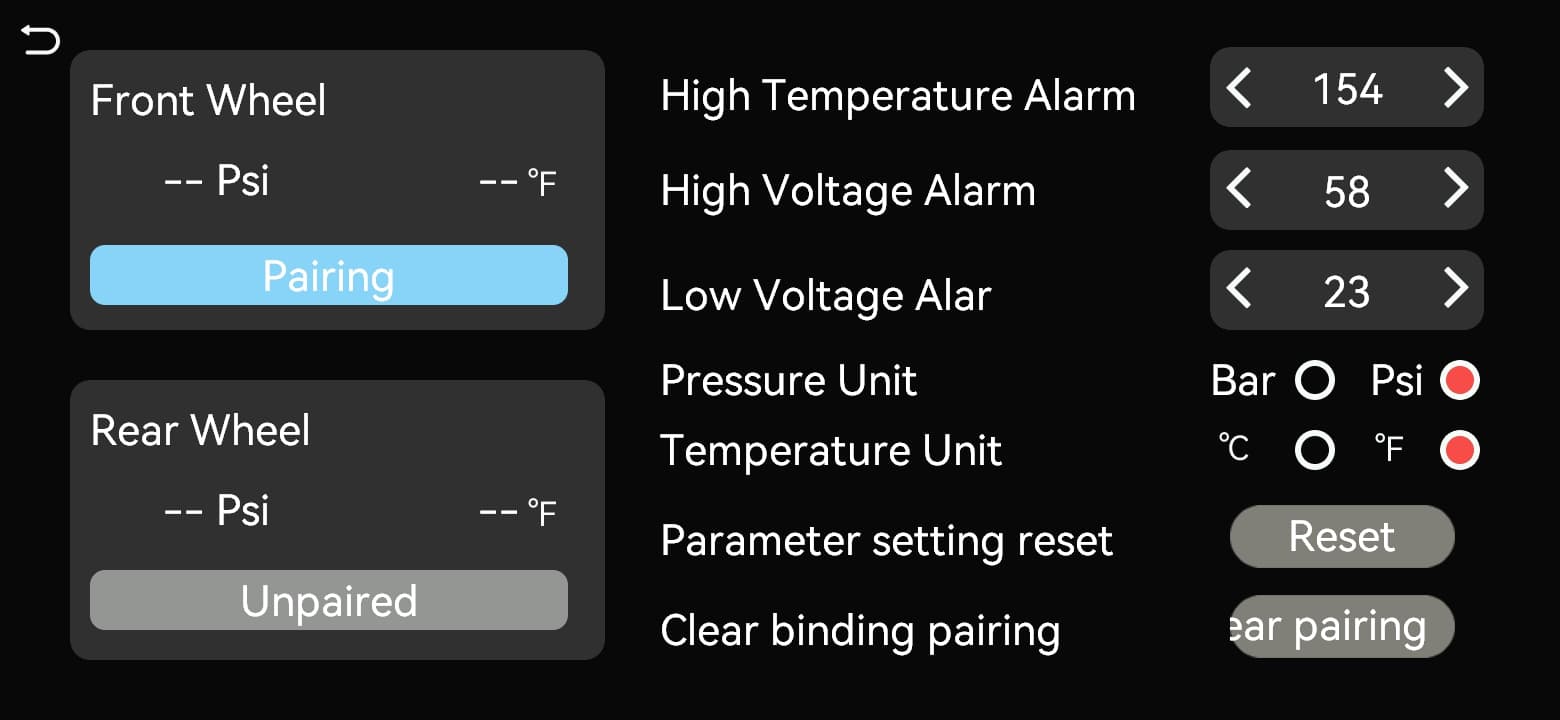
Pairing
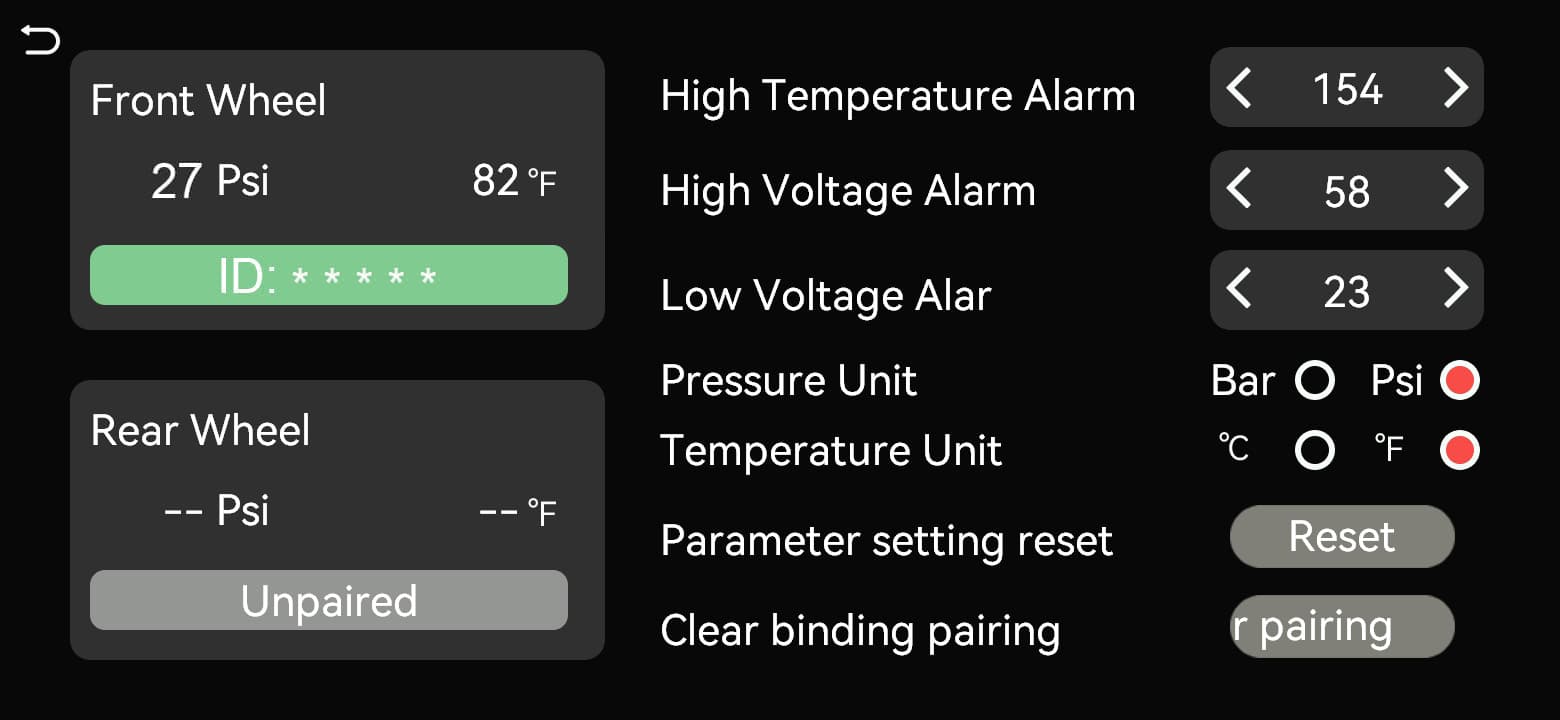
This wheel position shows tire pressure, temperature and ID
-
Open the pairing screen
Enable Tire Pressure Information, then tap the motorcycle area on the home screen. Tap the front or rear wheel to pair and confirm that “Pairing” appears for that wheel.
-
Activate the sensor
After Pairing appears, screw the corresponding external TPMS sensor clockwise onto the tire valve until seated. The sensor transmits continuously after detecting tire pressure.
-
Confirm the pairing result
Automatic pairing succeeds when the display receives the sensor signal and updates the selected wheel's pressure reading.
-
Pair the other wheel
Select the other wheel and repeat these steps with the other sensor.
03.04Manual pairing (manual-pairing versions)
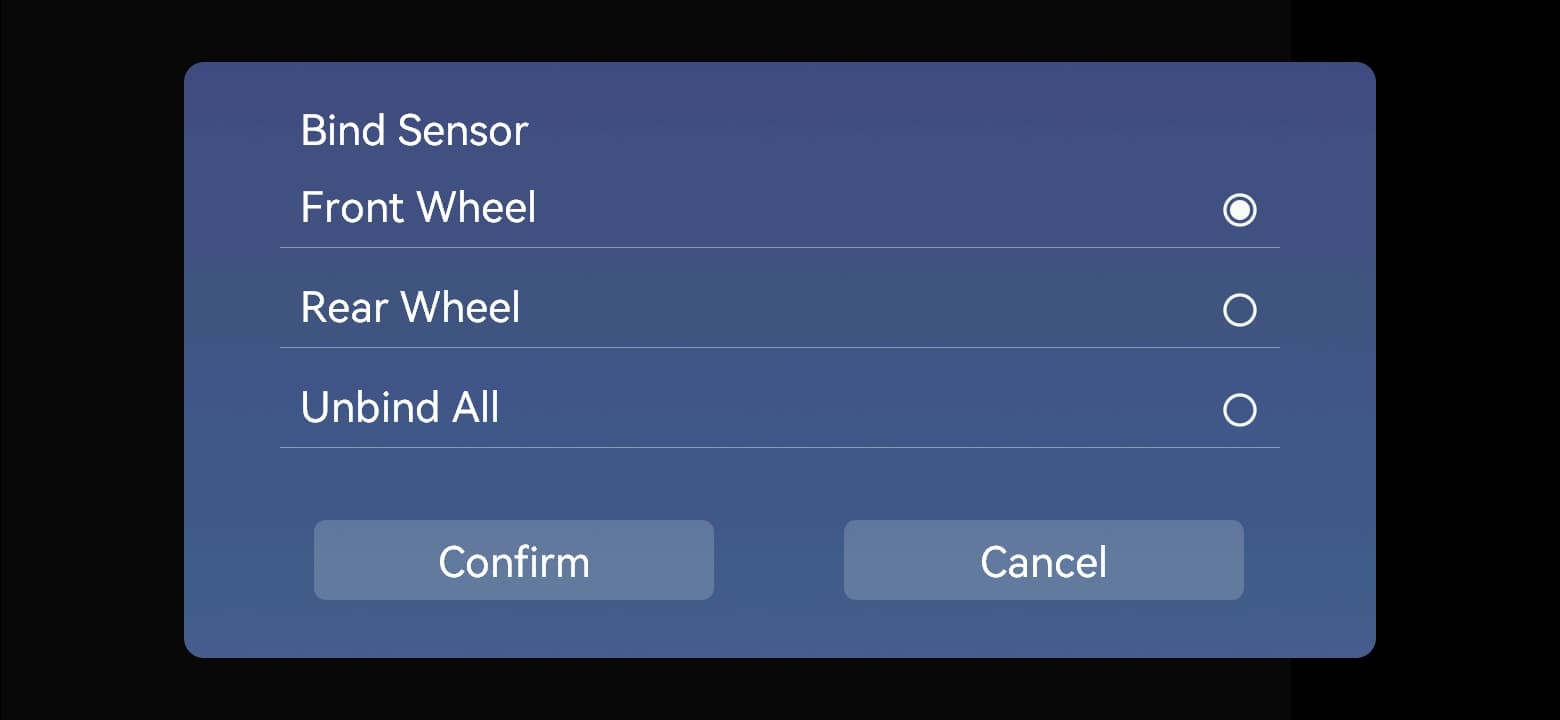
Bind sensor: Front wheel / Rear wheel → Confirm
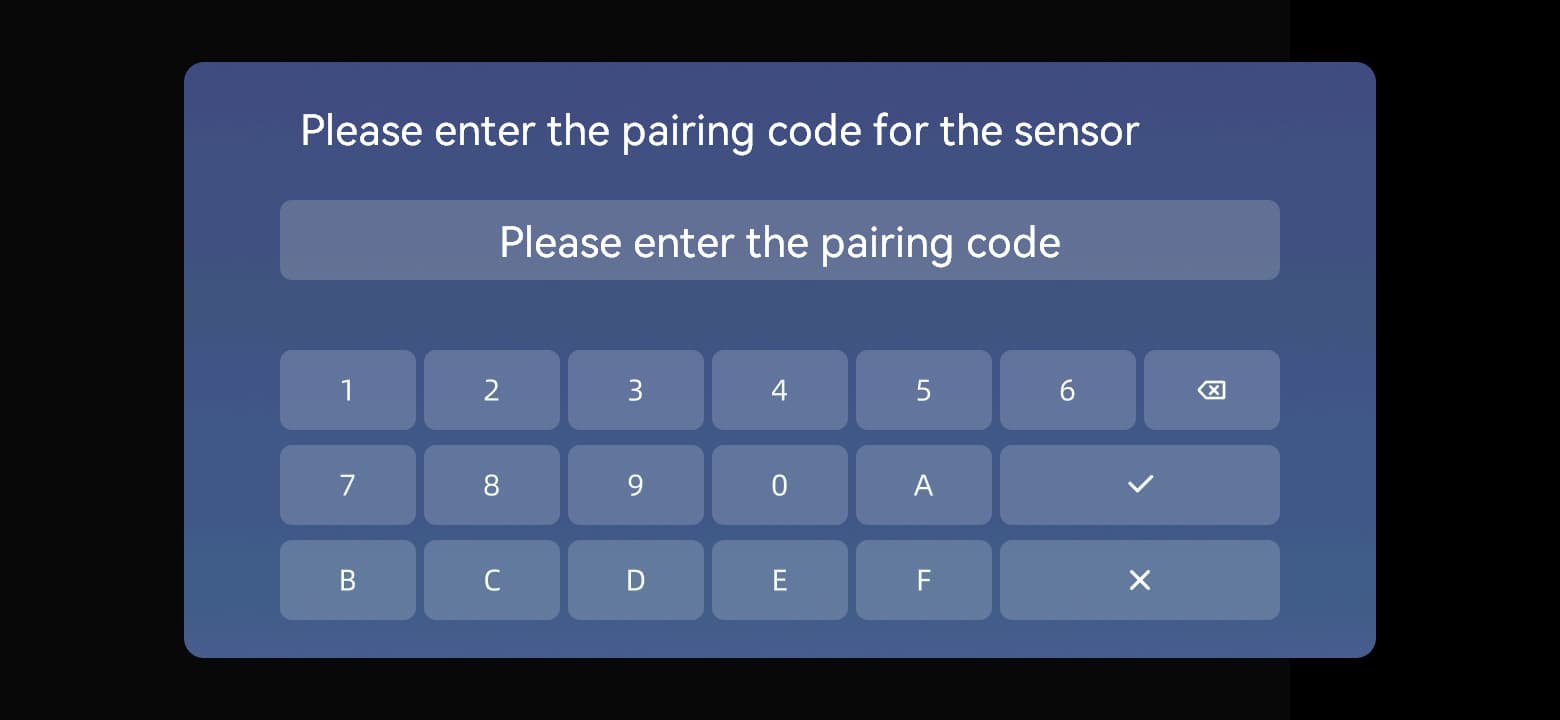
Enter the sensor pairing code
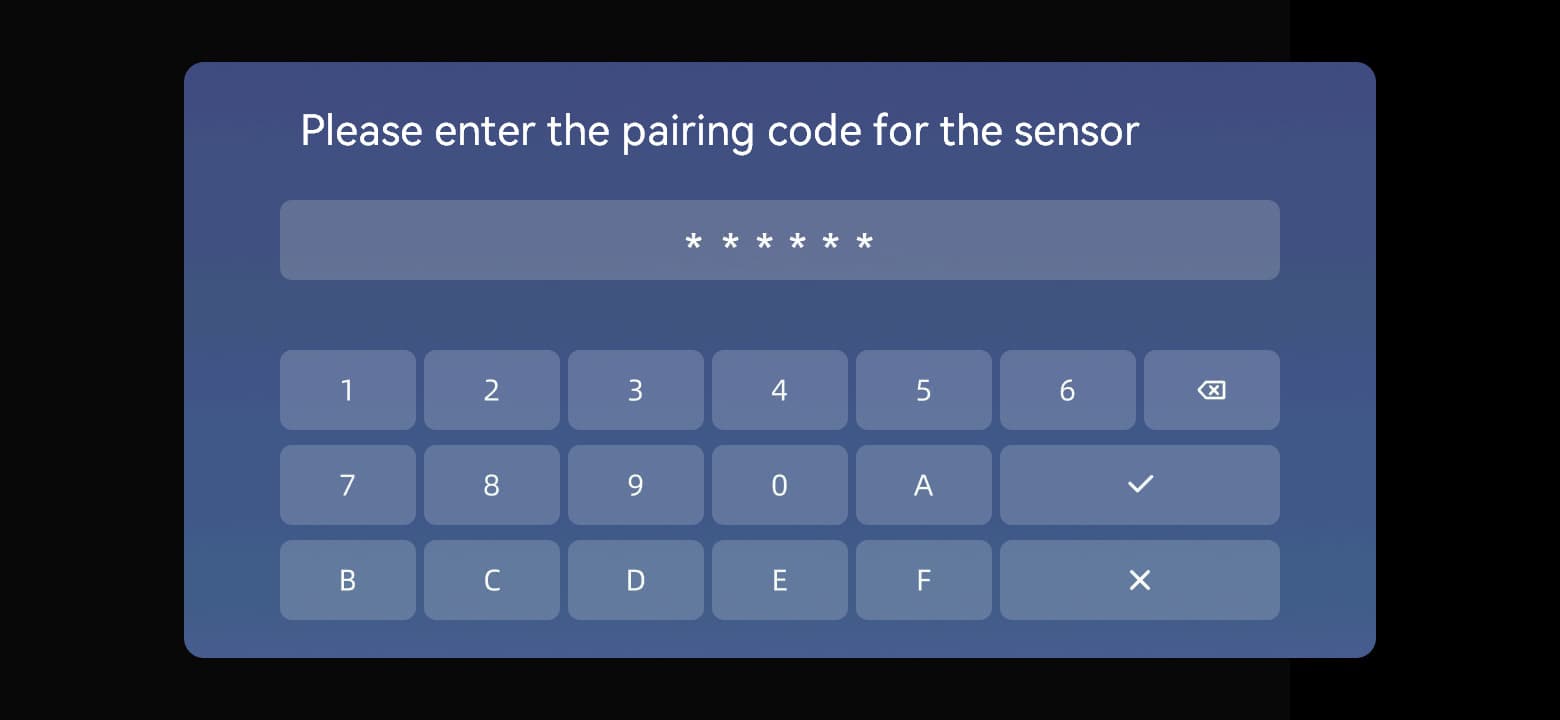
Enter the six characters on the sensor, then tap ✓
Data displayed; pairing successful
-
Open the pairing window
Tap the motorcycle area on the home screen, then a wheel. In “Bind Sensor”, select “Front Wheel” or “Rear Wheel” as appropriate and tap “Confirm”.
-
Enter the sensor ID
Enter the six characters printed on the sensor and tap ✓ to confirm. Use the delete key to correct mistakes or tap × to cancel.
-
Activate the sensor
Screw the corresponding external TPMS sensor clockwise onto the tire valve until seated. The sensor transmits continuously after detecting tire pressure.
-
Confirm the pairing result
Manual pairing succeeds when the display receives the signal and updates the selected wheel's pressure reading.
-
Pair the other wheel
Select the other wheel, enter that sensor's six-character ID and repeat the pairing steps.
03.05Post-installation check
After the sensor is seated, hold it steady and use the supplied wrench to tighten the pre-installed locknut against the sensor base. Do not loosen the sensor or bend the valve. Then check the valve base and sensor connection for leaks. If a leak is found, inspect the installation, seal and valve condition; do not use extra tightening force as a substitute for troubleshooting.
Check that the on-screen wheel position matches the actual installation.
Check that the sensor and locknut are secure.
Check the valve area for leaks.
Before riding, confirm readings appear for every installed sensor.
03.06Replace the sensor battery
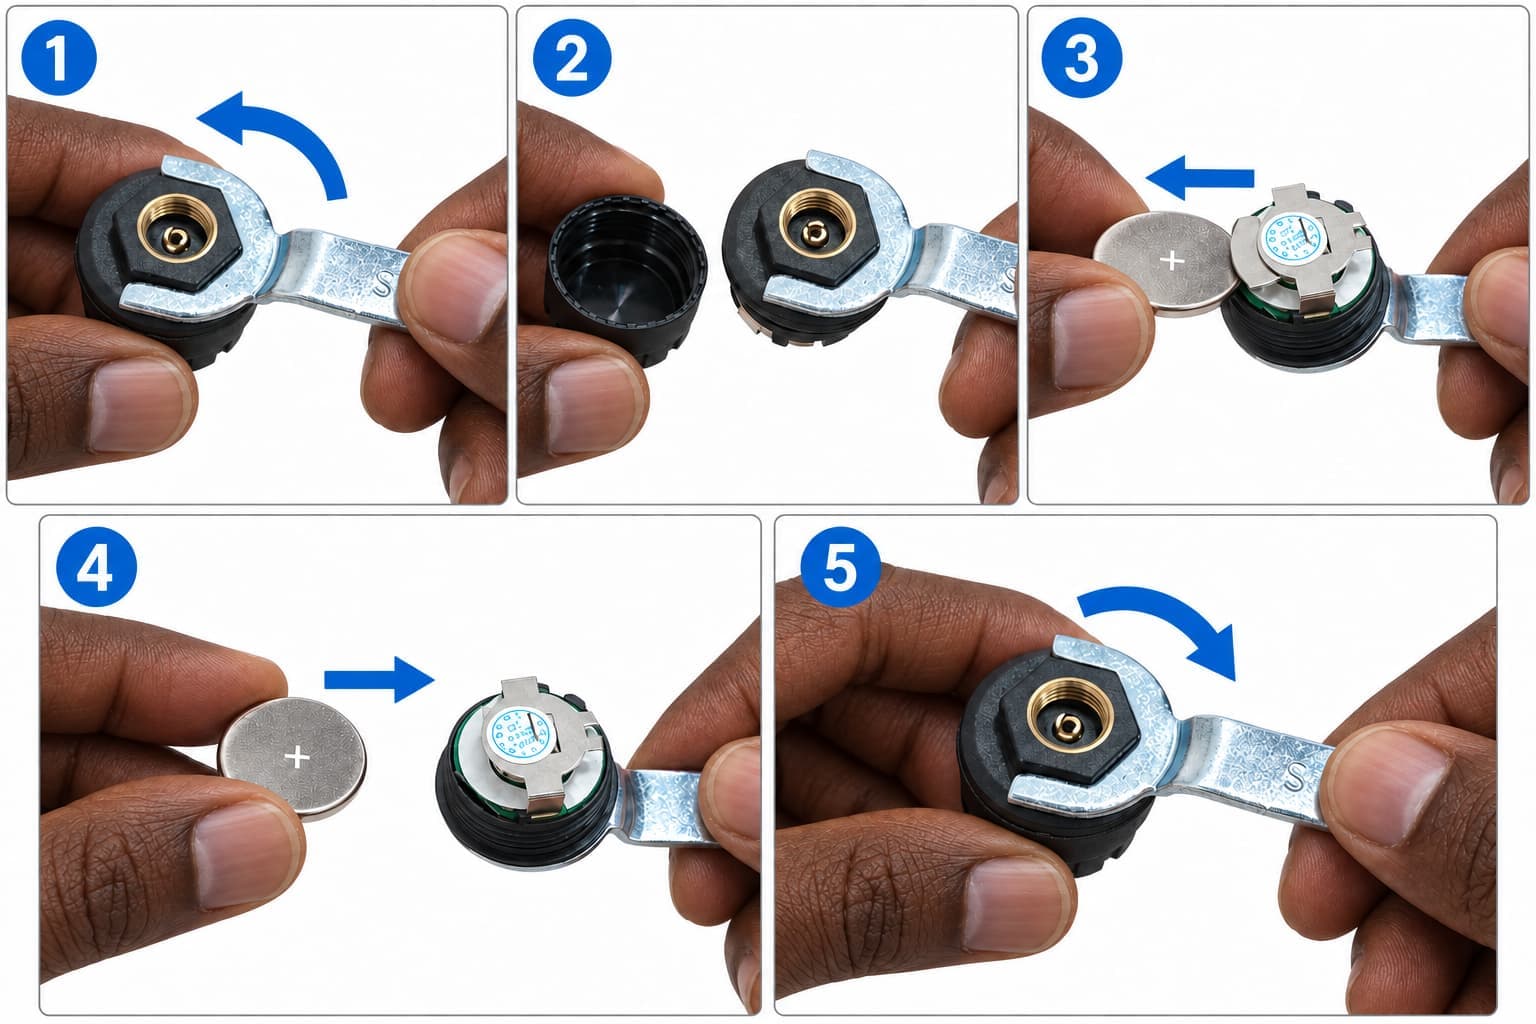
-
Remove the sensor
Park safely. Loosen the locknut with the supplied wrench, then unscrew the sensor counterclockwise.
-
Open the battery compartment
Hold the sensor housing steady. Fit the supplied wrench over the hexagonal protrusion on the bottom and turn counterclockwise to separate the housing from the internal assembly.
-
Remove the old battery
Note the battery polarity and slide the old CR1632 battery out from the side of the compartment. Do not pry on the circuit board or metal contacts.
-
Install the new battery
Slide in a new CR1632 battery with the same polarity as the original. Make sure it is fully seated.
-
Inspect and close
Check that the sealing ring is clean, undamaged and properly seated. Reassemble the housing and internal parts, then tighten clockwise with the supplied wrench.
-
Reinstall and inspect
Reinstall the sensor on its original wheel, tighten the locknut and confirm pressure readings return. Repeat pairing if no readings appear.
03.07Alarm thresholds and abnormal tire pressure
Tire pressure settings and wheel-position information
Before setting thresholds, consult the vehicle or tire manufacturer's pressure requirements for the operating conditions. The sensor's measurement range is not a recommended tire pressure. If a reading or alarm is abnormal, park safely, inspect the tire, valve and sensor, and verify pressure with a suitable gauge. Do not ride until leaks or tire damage are resolved. TPMS does not replace routine tire checks.
Routine maintenance
04.01Before every ride
Check that the display and mount are secure and do not obstruct your view. Check cables for wear or pinching, free steering movement, and closed card-slot and visible seals. With TPMS installed, check valves for deformation or cracks, secure sensors and locknuts, adequate clearance and no leaks. Verify cold tire pressure. Correct wheel assignments and normal readings do not replace physical checks. See Section 01.02 for valve safety requirements.
04.02TPMS maintenance
Clean the sensor exterior and inspect the valve and locknut. After replacing a battery or reinstalling a sensor, follow Section 03.06 to check seals, wheel assignment, readings and leaks. Battery life varies with operating conditions.
04.03Recycling and disposal
Sort packaging for appropriate local recycling. Ask your local electrical-equipment recycling service how to dispose of the product. Do not burn it. Follow Section 03.06 to safely remove replaceable sensor batteries. Keep new and used batteries away from metal objects to prevent short circuits, and use appropriate local battery recycling services. Do not disassemble the display for recycling yourself.
Troubleshooting
05.01TPMS problems
No tire pressure data
Check that TPMS is enabled, the correct front/rear wheel is selected, and the sensor is properly installed.
Next: pair the corresponding wheel again.
Incorrect wheel position shown
Check whether front and rear sensors were swapped and whether the correct wheel was selected during pairing.
Next: remove the affected pairing and pair again.
Air leak after installing a tire pressure sensor
Check correct sensor and nut installation, and inspect the valve and seals for dirt or damage.
Next: remove the sensor and refit the valve cap immediately. Do not ride until the leak is resolved.
Technical support
Prepare device information and a description of the fault before contacting support.
06.01Self-service

Official website: https://www.aotu-link.com
For after-sales assistance, open and complete the “06.02 After-sales support request” form below. This provides the required information at once and helps us respond more quickly.
If you cannot use the form, email support@aotu-link.com, and include the product model, purchase channel and a description of the issue.
Online customer service: click the blue chat icon on this page to speak with an agent when available.